

Breast Self-Exam: 10 Easy At-Home Methods for Early Detection
Early detection remains one of the strongest tools for protecting breast health. When you understand your own body, you can notice changes sooner and take action quickly. That is why practicing a breast self-exam at home becomes an important habit. Although a breast self-exam does not replace professional screenings, it still helps you stay aware of what feels normal. Below are 10 simple and effective at-home methods you can follow confidently.
1. Begin With a Mirror Check
Stand in front of a mirror and observe the size, shape, and symmetry of your breasts. This step strengthens your awareness and gives you a clear image of what looks normal before moving to other breast self-exam techniques.
2. Raise Your Arms to Spot Changes
Lift your arms and notice any changes in shape, skin texture, or nipple direction. This movement helps you see differences that might not appear when your arms are relaxed.
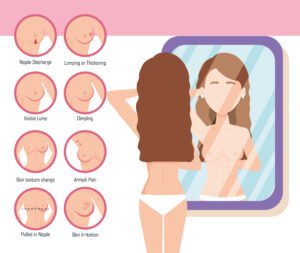
3. Check for Nipple Discharge
4. Feel for Lumps in Circular Motions
Use your fingertips to feel around the breast in small circular movements. Cover the entire area from the outer edges toward the center. This ensures deeper tissue is examined thoroughly.
5. Examine While Lying Down
Lie on your back with one arm behind your head. Use your opposite hand to feel the entire breast. This position spreads the tissue evenly, making your breast self-exam more accurate.
6. Slide Your Fingers in Vertical Patterns
Move your fingers up and down from the collarbone to the under-bust area. This approach helps you cover every section and supports a complete breast self-exam routine.
7. Check the Underarm Area
Since breast tissue extends to the armpit, make sure to feel the underarm region for swelling or tenderness.
8. Use Light and Firm Pressure
9. Perform the Exam in the Shower
Warm water relaxes muscles and allows your fingers to glide smoothly over the skin. This makes the breast self-exam more comfortable and natural.
10. Track Your Monthly Changes
Keep a simple record of what you feel each month. Consistent tracking helps you detect new changes early and strengthens your understanding of what is normal for you.
Conclusion
In conclusion, using these 10 at-home methods empowers you to monitor your health with confidence. While a breast self-exam cannot replace medical checkups, it plays an important role in early awareness and prevention. Practicing it regularly helps you stay informed, proactive, and in control of your wellbeing.